Home » Auto saw » How To Set Up Mitre Saw: A Step-by-Step Guide
How To Set Up Mitre Saw: A Step-by-Step Guide
As an Amazon Associate, I earn from qualifying purchases.
A mitre saw is a versatile and powerful tool used for making precise cuts in woodworking projects. Setting up a mitre saw can be a daunting task for beginners who are unfamiliar with the tool. However, with the right guidance and understanding of the process, setting up a mitre saw can be quick and easy. This guide will take you through the step-by-step process of setting up a mitre saw, including safety tips, blade installation, and adjusting the angles.
Before we dive into the setup process, let’s first go over the different types of mitre saws that are available.
Compound Mitre Saw
A compound mitre saw is a basic type of mitre saw that can make angled cuts in one direction, either left or right. The blade can be tilted to make bevel cuts, but only in one direction. This type of saw is suitable for making simple cuts on smaller workpieces.
Sliding Compound Mitre Saw
A sliding compound mitre saw can make angled cuts in both directions, left and right, as well as bevel cuts in both directions. This type of saw also has a sliding feature, which allows the blade to move back and forth, increasing the cutting capacity of the saw.
Dual Bevel Sliding Compound Mitre Saw
A dual bevel sliding compound mitre saw has all the features of a sliding compound mitre saw, but with the added ability to tilt the blade in both directions, left and right. This allows for more versatility in cutting different angles and bevels.
Components of a Mitre Saw
A mitre saw consists of several components that work together to make precise cuts.
Blade
The blade is the most important component of a mitre saw. It is responsible for making the actual cuts in the workpiece. Different blades are available for cutting different materials, such as wood, metal, or plastic.
Blade Guard
The blade guard is a safety feature that covers the blade when it is not in use. It is designed to protect the user from accidentally coming into contact with the blade.
Dust Bag
The dust bag is another safety feature that collects sawdust and debris created during the cutting process. This helps to keep the work area clean and free of debris, reducing the risk of accidents.
Mitre Gauge
The mitre gauge is used to guide the workpiece at the desired angle for making a cut. It can be adjusted to different angles, typically up to 45 degrees.
Bevel Gauge
The bevel gauge is used to tilt the blade at the desired angle for making a bevel cut. It can be adjusted up to 45 degrees in either direction.
Fence
The fence is a guide that helps to ensure that the workpiece is positioned correctly for the cut. It provides support and stability to the workpiece during the cutting process.
Safety Features
Aside from the blade guard and dust bag, mitre saws also come with other safety features, such as blade brakes and lockout switches. These are designed to prevent accidents and injuries while using the saw.
Assembly and Installation
Now that you are familiar with the different types and components of a mitre saw, let’s move on to the assembly and installation process.
Unpacking
Before you start, make sure you have all the components required for the assembly, including the saw, the blade, the blade guard, the dust bag, the mitre gauge, the bevel gauge, and the fence.
Begin by unpacking the saw and laying out all the components in a clear and organized manner.
Mounting the Saw
Next, you need to mount the saw to a stable and sturdy surface. This can be a workbench or table that is securely anchored to the ground.
Once you have identified the location for the saw, use the provided screws and brackets to mount it to the surface.
Installing the Blade
With the saw securely mounted, you can now install the blade.
First, unplug the saw from the power source and loosen the blade nut. Carefully remove the old blade and install the new blade, making sure it is properly aligned with the saw.
Tighten the blade nut to secure the blade in place.
Adjusting the Bevel Angle
To adjust the bevel angle, loosen the bevel lock knob and tilt the blade to the desired angle using the bevel gauge.
Once you have set the angle, tighten the bevel lock knob to secure the blade in place.
Adjusting the Mitre Angle
To adjust the mitre angle, loosen the mitre lock knob and position the workpiece at the desired angle using the mitre gauge.
Once you have set the angle, tighten the mitre lock knob to secure the workpiece in place.
Safety Precautions
Before you start making cuts, it is important to take some safety precautions to ensure that you are using the saw correctly and safely.
First, make sure that you are wearing appropriate safety gear, such as safety glasses and hearing protection.
Second, make sure that the saw is properly grounded and that the power cord is in good condition.
Third, always keep your hands away from the blade and never attempt to reach over the blade while it is in motion.
Fourth, always use the saw in a well-ventilated area to prevent inhalation of sawdust and debris.
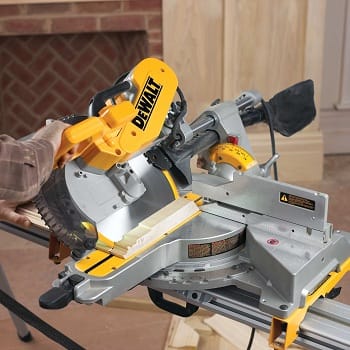
Making the First Cut
Now that you have set up the saw and taken all the necessary safety precautions, you can start making your first cut.
Preparing the Workpiece
Before you start cutting, make sure that the workpiece is securely positioned against the fence and the mitre gauge.
Also, make sure that the blade is at the desired angle for making the cut.
Positioning the Saw
Position yourself in front of the saw, making sure that you are standing to the side of the blade, not directly in front of it.
Grasp the saw handle firmly with both hands and turn on the power.
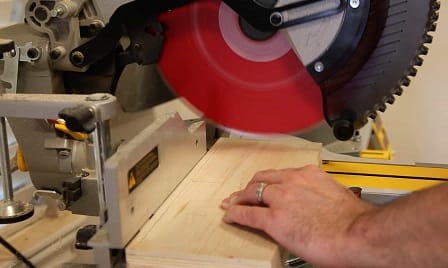
Aligning the Blade
Slowly lower the blade onto the workpiece, making sure that the blade is properly aligned with the cut line.
Take your time and make sure that the blade is fully lowered before making the cut.
Making the Cut
With the blade properly aligned, slowly push the saw forward, making the cut.
Be sure to keep your hands firmly on the saw handle and your eyes on the blade at all times.
Finishing the Cut
Once the cut is complete, release the saw trigger and allow the blade to come to a complete stop before lifting it back up.
Clean-Up
After making your cuts, turn off the saw and unplug it from the power source.
Remove any excess sawdust or debris from the work area and dispose of it properly.
Maintenance
To ensure the longevity of your mitre saw, it is important to perform regular maintenance checks.
This includes checking the blade for damage or wear, lubricating the saw and its components, and keeping the saw clean and free of debris.
FAQs
What type of blade should I use with my mitre saw?
It depends on the material you will be cutting. Consult the manufacturer’s instructions for guidance on the appropriate blade to use.
Can I use a mitre saw for non-wood materials?
Yes, mitre saws can be used to cut a variety of materials, such as plastics, metals, and ceramics.
Can I change the blade angle while the saw is in motion?
No, you should always adjust the blade angle with the saw turned off and the blade at a complete stop.
Do I need to wear hearing protection when using a mitre saw?
Yes, mitre saws can be very loud and can cause hearing damage over time. Always wear appropriate hearing protection when using power tools.
How often should I perform maintenance on my mitre saw?
It is recommended to perform maintenance checks on your mitre saw after every use and to perform more thorough maintenance checks every 6-12 months, depending on the frequency of use.
Conclusion
Setting up a mitre saw can seem daunting at first, but by following these simple steps, you can have your saw up and running in no time.
Always remember to take the necessary safety precautions, properly prepare your workpiece, and keep the saw and work area clean and free of debris.